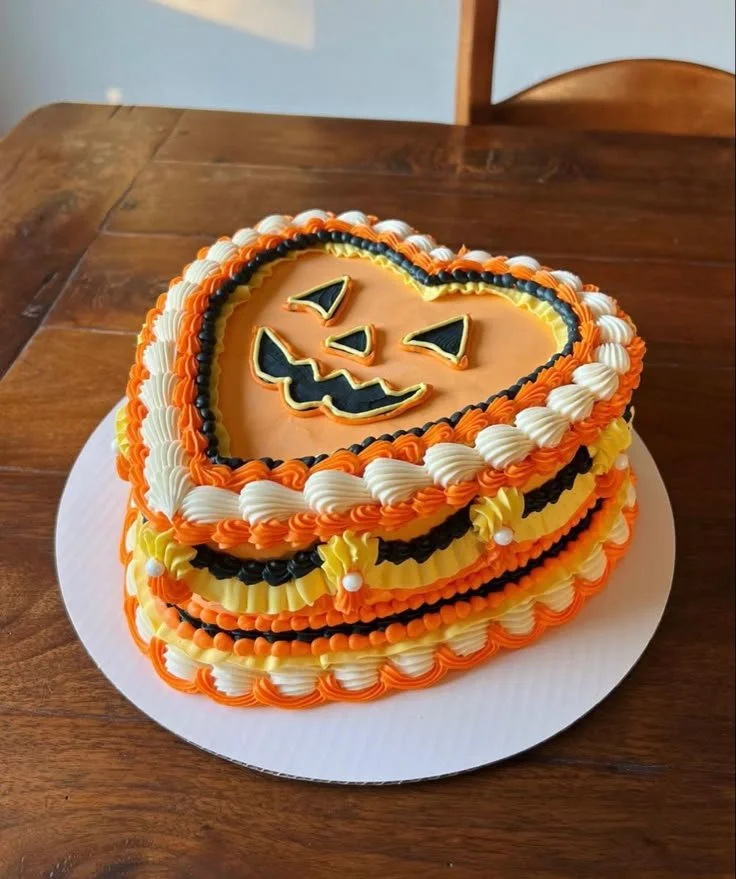
This Halloween Vintage Style Cake combines nostalgia with a rich, festive flavor that captures the essence of autumn celebrations. Perfect for gatherings, this cake not only pleases the eyes but also delights the palate, making it a must-bake for your holiday festivities.
Why You’ll Love Halloween Vintage Style Cake
- Nostalgic Flavors: This cake features traditional spices and flavors that bring back memories of classic autumn recipes, making it a heartwarming treat for all ages.
- Eye-Catching Design: The vintage style often includes intricate decorations that make the cake a beautiful centerpiece at any gathering, impressing your guests.
- Simple Ingredients: With common pantry staples, this cake is accessible for home bakers of all skill levels, ensuring you won’t have to hunt for exotic ingredients.
- Moist and Flavorful: Combining the richness of butter and eggs with spices results in a moist texture that makes each slice delightful to savor.
- Versatile Serve Options: Perfect for any occasion, this cake can be served plain or adorned with a variety of toppings, from whipped cream to vintage-style frostings.
Recipe Overview
- Prep time: 20 minutes
- Cook time: 30-35 minutes
- Total time: 50-55 minutes
- Servings: 12 slices
- Difficulty level: Easy
Ingredients You’ll Need for Halloween Vintage Style Cake
-
Dry Ingredients:
- 2 cups all-purpose flour
- 1 ½ cups granulated sugar
- 1 teaspoon baking powder
- 1 teaspoon baking soda
- ½ teaspoon salt
- 2 teaspoons ground cinnamon
- ½ teaspoon ground nutmeg
-
Wet Ingredients:
- ½ cup unsalted butter, softened
- 1 cup buttermilk
- 3 large eggs
- 1 teaspoon vanilla extract
-
Optional Toppings:
- Whipped cream
- Cream cheese frosting
- Seasonal sprinkles or edible decorations

How to Make Halloween Vintage Style Cake
-
Preheat the Oven: Preheat your oven to 350°F (175°C) to ensure the cake bakes evenly.
-
Prepare the Cake Pans: Grease and flour two 9-inch round cake pans to prevent sticking and allow for easy removal once baked.
-
Mix Dry Ingredients: In a large bowl, whisk together the flour, sugar, baking powder, baking soda, salt, cinnamon, and nutmeg until thoroughly combined.
-
Combine Wet Ingredients: In a separate bowl, beat the softened butter until creamy. Add in the buttermilk, eggs, and vanilla extract, mixing well until smooth.
-
Combine Mixtures: Gradually add the wet mixture to the dry ingredients, stirring gently to fold everything together until just combined. Do not overmix; small lumps are okay.
-
Bake the Cake: Divide the batter evenly between the prepared cake pans. Bake for 30-35 minutes, or until a toothpick inserted into the center comes out clean.
-
Cool the Cakes: Allow the cakes to cool in the pans for about 10 minutes, then carefully transfer to a wire rack to cool completely before frosting.
Tips for Success
- Room Temperature Ingredients: Make sure to use room temperature butter and eggs for a smooth batter and better texture.
- Measuring Flour: Spoon and level your flour instead of scooping directly from the bag, which can pack it down and lead to a dry cake.
- Check for Doneness: Start checking for doneness at 25 minutes; ovens can vary, and you want to avoid overbaking.
- Cool Completely: Ensure the cakes are completely cooled before frosting to prevent melting and sliding.
Easy Variations
- Spice Adjustments: Enhance the flavor by adding ginger or cloves for a more complex spice profile.
- Fruit Addition: Add raisins or chopped nuts to the batter for extra texture and flavor.
- Gluten-Free Option: Substitute all-purpose flour with a 1-to-1 gluten-free baking blend for a gluten-free version.
- Frosting Change: Use a chocolate ganache instead of traditional frosting for a rich twist.
What to Serve with Halloween Vintage Style Cake
- Warm Spiced Cider: The warmth of cider complements the spices in the cake beautifully.
- Vanilla Ice Cream: The creaminess of vanilla ice cream contrasts nicely with the softness of the cake.
- Pumpkin Soup: A light pumpkin soup makes for a cozy starter before enjoying the cake.
- Cheese Platter: A selection of cheeses adds a savory balance to the sweetness of the cake.
Storage and Reheating
- Refrigerator Storage: Store leftover cake in an airtight container in the refrigerator for up to 5 days.
- Freezer Storage: Freeze slices wrapped in plastic wrap and then in aluminum foil for up to 3 months.
- Reheating: To enjoy leftovers, reheat individual slices in the microwave for about 15-20 seconds or in a preheated oven at 350°F (175°C) for 10 minutes.
- Preserving Texture: To maintain moisture, keep the cake covered while stored.
Common Mistakes to Avoid
- Overmixing the Batter: Mixing too much can lead to a dense cake; stir until just combined.
- Not Measuring Ingredients Properly: Accurate measurements are key for baking; use a kitchen scale if possible.
- Skipping the Cooling Step: Don’t frost while the cake is warm to prevent melting and unsightly presentation.
Halloween Vintage Style Cake: Background & Cultural Inspiration
The Halloween Vintage Style Cake draws inspiration from traditional seasonal baking that celebrates the harvest season. The blend of spices like cinnamon and nutmeg is rooted in recipes passed down through generations. Historically, cakes during fall festivities often featured ingredients like apples and pumpkins, reflecting the bounty of the harvest. The vintage aesthetics mirror the charm of rustic autumn gatherings, evoking feelings of warmth and comfort that come with family traditions.
Frequently Asked Questions
Can I make this cake in advance?
Yes! This cake can be baked and stored in the fridge for up to 5 days or frozen for longer storage.
What can I substitute for buttermilk?
You can make a homemade version by mixing 1 cup of milk with 1 tablespoon of vinegar or lemon juice, allowing it to sit for about 5 minutes.
Is it possible to make this cake dairy-free?
You can use dairy-free butter and a non-dairy milk substitute to create a dairy-free version of this cake.
How can I make the cake more festive for Halloween?
Consider adding orange or black food coloring to your frosting or decorating with spooky edible decorations, like mini pumpkins or ghosts.
What’s the best way to frost this cake?
Use a crumb coat first to seal in crumbs, then follow with a thicker layer of frosting for a smoother finish.
Final Thoughts
Baking this Halloween Vintage Style Cake is a wonderful way to embrace the flavors of fall and create lasting memories with friends and family. Its warm spices and inviting aroma make it a delightful addition to any autumn gathering. Whether enjoyed with a cup of warm cider or shared at a festive party, this cake promises to bring joy to your table. Don’t hesitate to try this recipe and bring some vintage charm to your next celebration!
PrintHalloween Vintage Style Cake
This cake combines nostalgia with rich, festive flavors, making it a beautiful centerpiece for your autumn celebrations.
- Prep Time: 20
- Cook Time: 35
- Total Time: 55
- Yield: 12 slices
- Category: Dessert
- Method: Baking
- Cuisine: American
- Diet: Vegetarian
Ingredients
- 2 cups all-purpose flour
- 1 ½ cups granulated sugar
- 1 teaspoon baking powder
- 1 teaspoon baking soda
- ½ teaspoon salt
- 2 teaspoons ground cinnamon
- ½ teaspoon ground nutmeg
- ½ cup unsalted butter, softened
- 1 cup buttermilk
- 3 large eggs
- 1 teaspoon vanilla extract
- Whipped cream (optional)
- Cream cheese frosting (optional)
- Seasonal sprinkles or edible decorations (optional)
Instructions
- Preheat the Oven: Preheat your oven to 350°F (175°C).
- Prepare the Cake Pans: Grease and flour two 9-inch round cake pans.
- Mix Dry Ingredients: In a large bowl, whisk together the flour, sugar, baking powder, baking soda, salt, cinnamon, and nutmeg until combined.
- Combine Wet Ingredients: In a separate bowl, beat the butter until creamy. Add buttermilk, eggs, and vanilla extract, mixing well.
- Combine Mixtures: Gradually add the wet mixture to the dry ingredients, stirring gently until just combined.
- Bake the Cake: Divide the batter between the pans and bake for 30-35 minutes, or until a toothpick comes out clean.
- Cool the Cakes: Allow the cakes to cool in the pans for about 10 minutes, then transfer to a wire rack to cool completely.
Notes
Use room temperature ingredients for better texture. Ensure cakes are fully cooled before frosting.