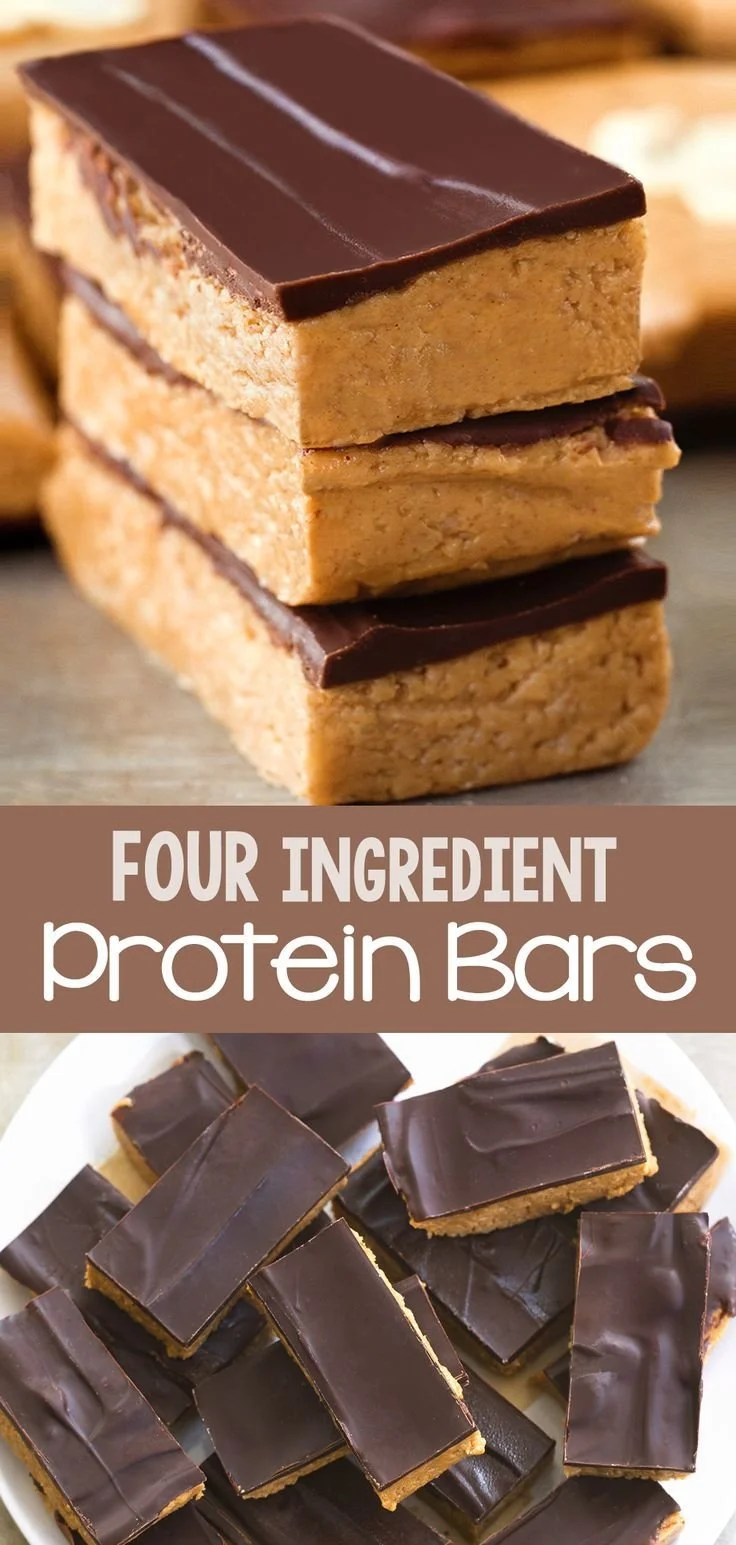
Homemade Protein Bars provide a nourishing and satisfying snack option that you can easily customize to suit your taste. Not only are they quick to prepare, but they also make a fantastic grab-and-go option for busy days. Once you try making these at home, you’ll wonder why you ever bought store-bought bars!
Why You’ll Love Homemade Protein Bars
- Easy to Make: With just a few simple ingredients, you can whip these up in no time, making them a hassle-free snack.
- Customizable: Adjust the ingredients based on your preferences or dietary needs, from swapping nut butter to varying toppings.
- Healthy Snacking: These bars are packed with protein and wholesome ingredients, providing you with the energy you need without the excess sugar found in many commercial options.
- Budget-Friendly: Making your own protein bars is often less expensive than buying them pre-packaged, helping you save money while enjoying a healthy treat.
- Perfect for Meal Prep: Make a batch at the beginning of the week, and you’ll have an easy snack option ready whenever you need it.
Recipe Overview
- Prep Time: 10 minutes
- Cook Time: 0 minutes (refrigeration time is required)
- Total Time: 1 hour 10 minutes
- Servings: 8 bars
- Difficulty Level: Easy
Ingredients You’ll Need for Homemade Protein Bars
- 1 cup nut butter (peanut butter or almond butter work great)
- 1/2 cup oats (use gluten-free if needed)
- 1/4 cup honey or maple syrup
- 1/2 cup vanilla extract
- 1/4 cup chopped nuts or seeds (such as almonds or sunflower seeds)
- 1/4 cup dried fruit (like cranberries or raisins) or dark chocolate chips
- Pinch of salt

How to Make Homemade Protein Bars
-
Mix the Base
In a mixing bowl, combine the nut butter, oats, honey or maple syrup, and vanilla extract until well mixed. The mixture should be sticky and cohesive. -
Add Mix-Ins
Stir in the chopped nuts or seeds, dried fruit or chocolate chips, and a pinch of salt. Make sure everything is evenly distributed throughout the mixture. -
Press into Dish
Press the mixture firmly into a lined baking dish evenly. Aim for a thickness of about 1 inch to ensure they hold together well. -
Refrigerate
Refrigerate for at least 1 hour until set. This helps the bars firm up for easier cutting and handling. -
Cut and Serve
Once set, cut into bars of your desired size. Enjoy your homemade protein bars as a snack or quick breakfast!
Tips for Success
- Choose a Creamy Nut Butter: For smoother bars, opt for creamy versions of peanut or almond butter rather than chunky.
- Don’t Skip the Refrigeration: Allowing the bars to chill is crucial for achieving the right texture. They’ll be too soft if you skip this step.
- Use Parchment Paper: Line your dish with parchment paper for easy removal of the bars once they are set.
- Mix Properly: Ensure all dry ingredients are well-combined with the wet mix to avoid clumps.
Easy Variations
- Protein Powder Boost: Add a scoop of your favorite protein powder to increase protein content.
- Nut-Free Option: Use sunflower seed butter or soy nut butter for a nut-free alternative.
- Spiced Bars: Sprinkle in cinnamon or nutmeg for added warmth and flavor.
- Fruit Swaps: Substitute dried fruit with crushed pretzels or shredded coconut.
- Chocolate Lovers: Fold in cacao nibs or use chocolate-flavored protein powder for a richer taste.
What to Serve with Homemade Protein Bars
- Fruit: Apples or bananas make a refreshing side that complements the bars’ texture and flavor.
- Yogurt: Pairing these bars with yogurt creates a balanced snack, especially with some fresh berries on top.
- Smoothies: Enjoy alongside a nutrient-rich smoothie for an extra boost of energy and flavor.
- Nut Milk: A glass of almond or oat milk can nicely balance out these bars’ richness.
Storage and Reheating
- Refrigerator Storage: Store in an airtight container in the fridge for up to one week.
- Freezer Storage: For longer storage, freeze the bars in a single layer. Once frozen, transfer them to a zip-top bag for up to two months.
- Reheating Method: There’s no need to reheat; enjoy them straight from the fridge or freezer.
- Preserve Texture: Ensure they are fully cooled before storing to prevent sogginess from condensation.
Common Mistakes to Avoid
- Not Mixing Well: Failing to thoroughly combine all the ingredients can result in uneven texture.
- Overpacking the Dish: Pressing too hard can make the bars too dense. Aim for a gentle, even pressure to keep them light and delicious.
- Skipping the Pinch of Salt: Including salt balances the sweetness and enhances the flavors.
- Not Allowing Enough Time to Chill: Rushing this step will make the bars fall apart when cut.
Homemade Protein Bars: Background & Cultural Inspiration
Homemade Protein Bars draw inspiration from the growing need for convenient, nutritious snacks in modern diets. They serve as a practical solution for busy lifestyles—providing the necessary fuel for workouts or busy days at work. Much of the creativity in making these bars comes from various snack cultures around the world that celebrate wholesome ingredients, from nut-rich travel snacks to energy-boosting treats prevalent in different cuisines.
Frequently Asked Questions
Can I use a different type of sweetener?
Yes, feel free to substitute honey with agave syrup or brown rice syrup for a vegan option.
How can I make these bars gluten-free?
Simply choose gluten-free oats and ensure your nut butter is also certified gluten-free.
Can I add protein powder to the recipe?
Absolutely! Incorporate a scoop of your preferred protein powder to enhance the health benefits.
How long do these protein bars last?
When stored in a refrigerator, they can last up to one week. If frozen, they’ll stay good for two months.
Are these protein bars suitable for kids?
Yes, these bars can be a great, nutritious snack for kids, but make sure to adjust the ingredients according to their preferences and any dietary restrictions.
Final Thoughts
Homemade Protein Bars are an excellent choice for those looking to maintain a balanced diet without sacrificing convenience. Quick to make and fully customizable, they fit seamlessly into busy lifestyles. Try making a batch today, and you’ll enjoy the delicious results while having a healthy snack on hand!
PrintHomemade Protein Bars
Delicious and nourishing homemade protein bars that are easy to make and customizable to suit your taste.
- Prep Time: 10 minutes
- Cook Time: 0 minutes
- Total Time: 70 minutes
- Yield: 8 bars
- Category: Snack
- Method: No-Cook
- Cuisine: American
- Diet: Vegetarian
Ingredients
- 1 cup nut butter (peanut butter or almond butter)
- 1/2 cup oats (gluten-free if needed)
- 1/4 cup honey or maple syrup
- 1/2 cup vanilla extract
- 1/4 cup chopped nuts or seeds (such as almonds or sunflower seeds)
- 1/4 cup dried fruit (like cranberries or raisins) or dark chocolate chips
- Pinch of salt
Instructions
- Mix the nut butter, oats, honey or maple syrup, and vanilla extract in a mixing bowl until well mixed.
- Add in the chopped nuts or seeds, dried fruit or chocolate chips, and a pinch of salt, ensuring everything is evenly distributed.
- Press the mixture firmly into a lined baking dish evenly, aiming for a thickness of about 1 inch.
- Refrigerate for at least 1 hour until set to help the bars firm up for easier cutting.
- Cut into bars of your desired size and enjoy as a snack or quick breakfast!
Notes
Consider using creamy nut butter for smoother bars and make sure to allow sufficient refrigeration time to achieve the right texture. Store in an airtight container in the fridge.