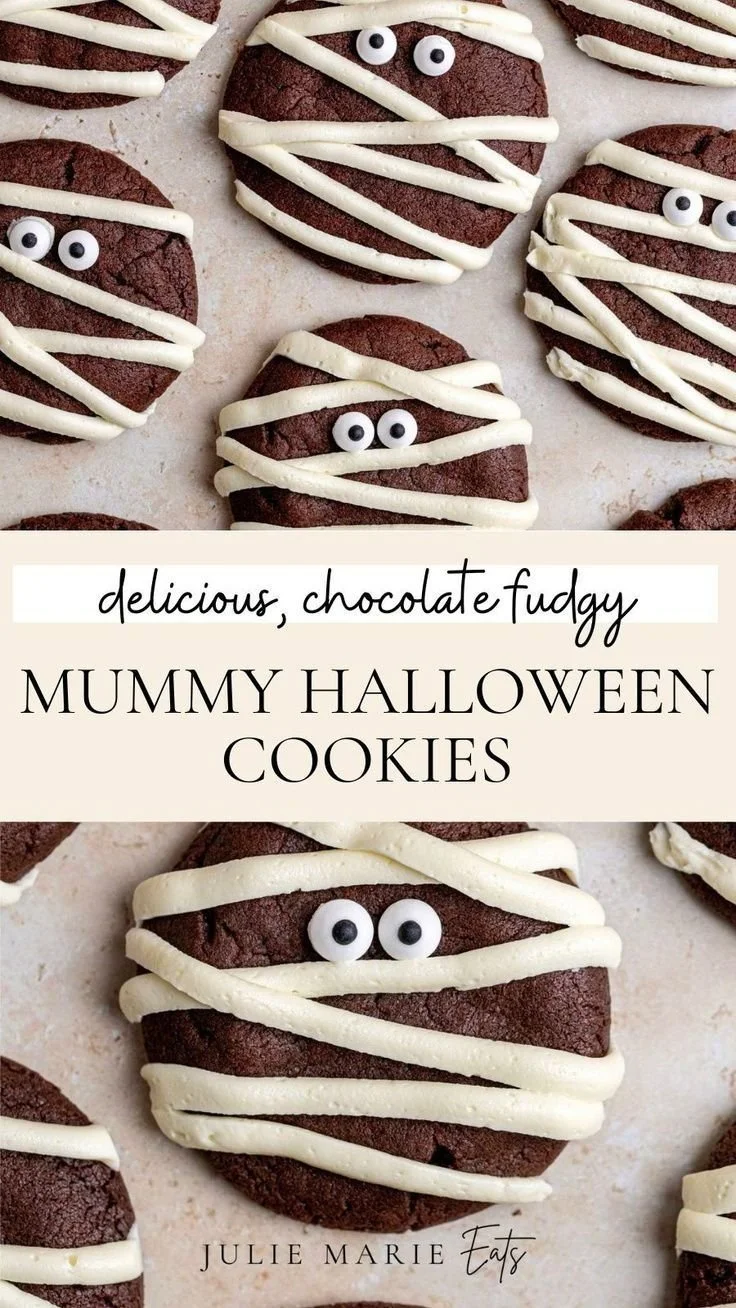
The Halloween Mummy Cookies recipe is a delightful way to celebrate the spooky season with a fun and delicious treat. These cookies are not only easy to make but are also sure to impress your friends and family at Halloween parties. With their chocolatey base and creative decoration, they offer a playful twist on classic cookies that everyone will love.
Why You’ll Love Halloween Mummy Cookies
- Fun for All Ages: These cookies are not only enjoyable to eat but also fun to decorate, making them a perfect activity for kids and adults alike.
- Quick and Easy: With a simple preparation method and just a short baking time, you can whip these up in no time, fitting perfectly into your busy schedule.
- Chocolate Fudge Delight: The rich chocolate flavor from the fudge cookie base is irresistibly delicious, satisfying any sweet tooth.
- Customizable Decorations: You can get creative with the mummy wrapping and eyes, allowing each cookie to have its unique character.
- Perfect for Parties: Their festive appearance makes them a standout dessert on any Halloween table, sure to be a hit with guests.
Recipe Overview
- Prep Time: 10 minutes
- Cook Time: 10-12 minutes
- Total Time: 20-22 minutes
- Servings: 24 cookies
- Difficulty Level: Easy
Ingredients You’ll Need for Halloween Mummy Cookies
-
Cookie Base:
- 1 cup chocolate fudge mix (for rich chocolate flavor)
- 1/2 cup butter (softened, helps create a tender cookie)
-
Frosting:
- 1 cup powdered sugar (for sweetness)
- 2 tablespoons milk (to achieve the right consistency)
- 1 teaspoon vanilla extract (adds flavor)
-
Decorations:
- Chocolate chips (for eyes)
- White decorative icing (for mummy wrapping)

How to Make Halloween Mummy Cookies
-
Preheat the Oven: Begin by preheating your oven to 350°F (175°C). This ensures your cookies bake evenly.
-
Prepare the Cookie Base: In a mixing bowl, prepare the chocolate fudge mix according to the package instructions. This step provides the base for your delicious cookies.
-
Shape the Cookies: Roll the dough into small balls, about 1 inch in diameter, and place them on a lined baking sheet. Space them a couple of inches apart to allow for spreading.
-
Bake the Cookies: Bake the cookies in the preheated oven for 10-12 minutes, or until they are set. Keep an eye on them; they should look slightly firm to the touch.
-
Cool Completely: Once done, remove them from the oven and let the cookies cool completely on a wire rack. This step is crucial for easy decoration.
-
Make the Buttercream Frosting: In a mixing bowl, combine the softened butter, powdered sugar, milk, and vanilla extract. Mix until you achieve a smooth and spreadable frosting.
-
Create Mummy Wraps: Once the cookies are cool, use the frosting to apply thin lines across the top of each cookie to mimic mummy wraps.
-
Add Eyes: Place two chocolate chips on each cookie to serve as the eyes of your mummies.
-
Serve and Enjoy: Your spooky Halloween Mummy Cookies are now ready! Serve them at your Halloween party and watch them disappear.
Tips for Success
- Don’t Overbake: Keep a close eye on the cookies while baking. They should be soft yet set. Overbaking can result in dry cookies.
- Cool Completely: Ensure that cookies are completely cool before frosting. Warm cookies can melt your icing.
- Practice Piping: If you’re new to decorating, practice piping the icing on a plate first to get a feel for the pressure.
- Use Quality Ingredients: High-quality butter and vanilla can elevate the flavor of your cookies.
- Adjust Consistency: If your frosting is too thick, add a little more milk. If it’s too thin, mix in more powdered sugar.
Easy Variations
- Different Mix Flavors: Try using other flavored fudges or brownie mixes, such as peanut butter or caramel.
- Royal Icing: For a different texture, consider using royal icing instead of buttercream for the mummy wraps.
- Candy Eyes: Substitute chocolate chips with candy googly eyes for a fun twist.
- Add a Crunch: Mix in some chopped nuts or crushed candy bars for added texture.
- Colorful Icing: Use colored icing to create a festive vibe, switching from traditional mummy colors to bright Halloween hues.
What to Serve with Halloween Mummy Cookies | Halloween Desserts for Parties
- Pumpkin Cupcakes: Their moist texture and seasonal flavor complement the chocolate cookies beautifully.
- Witch’s Brew Punch: A bubbling green punch enhances the spooky theme of your dessert table.
- Spooky Brownies: Layer up even more chocolate goodness with fudgy brownies that match the cookie flavors.
- Cheese and Crackers Platter: Balance out the sweet with a savory option that guests can snack on.
- Ghost Fruit Cups: Use fruit to lighten the dessert spread with fun ghost-themed cut fruit.
Storage and Reheating
- Refrigerator Storage: Store the cookies in an airtight container in the refrigerator for up to one week.
- Freezer Storage: They freeze well for up to three months. Place them in a single layer in an airtight container, separating layers with parchment paper.
- Reheating: To restore their softness, microwave for 10-15 seconds when needed.
- Maintain Texture: Be sure to cool cookies completely before frosting and storing to preserve their texture.
Common Mistakes to Avoid
- Impulsive Baking: Don’t skip letting the cookies cool before icing; warm cookies can melt the frosting.
- Incorrect Measurements: Ensure you measure ingredients accurately for the best texture. Use a kitchen scale if possible.
- Ignoring Oven Temp: Always preheat your oven. Starting with a cold oven can lead to undercooked cookies.
- Not Mixing Well: Make sure to mix the cookie dough thoroughly, so all ingredients are well combined for uniform baking.
- Skipping the Piping Practice: If you’re new to decorating, practice before icing your cookies to avoid messy wraps.
Halloween Mummy Cookies: Background & Cultural Inspiration
Halloween Mummy Cookies draw inspiration from the festive spirit of Halloween, where playful and spooky treats reign supreme. These cookies reflect the tradition of creative cookie decorating that’s prevalent in many cultures, especially around Halloween. Known for their fun appearance and rich flavor, these cookies offer a modern, whimsical take on the classic cookie, making them a perfect addition to any Halloween celebration. This playful approach aims to engage children and adults alike, fostering creativity and fun during the holiday season.
Frequently Asked Questions
Can I use a different frosting?
Yes, you can use any frosting you prefer, such as cream cheese frosting or store-bought icing.
How long do these cookies last?
When stored properly in an airtight container, they can last up to a week at room temperature or longer in the fridge.
Can I make these cookies ahead of time?
Absolutely! You can prepare the cookie base and store them unbaked or baked ahead of time. Just frost them when you’re ready to serve.
What’s the best way to decorate these cookies?
Using a piping bag or a ziplock bag with a small corner cut off can give you control over the icing design.
What if I don’t have chocolate chips for eyes?
You can use any small candy, like M&M’s or Skittles, to create eyes for your mummies.
Final Thoughts
Making Halloween Mummy Cookies is not just a fun baking project; it’s a way to engage with the spirit of the season while creating a treat that everyone will enjoy. With their easy preparation and playful decoration, these cookies are a perfect addition to your Halloween festivities. So gather your ingredients and get ready to create a batch of spooky delights that will surely impress your guests! Enjoy the deliciousness and have a hauntingly good time!
PrintHalloween Mummy Cookies

Delightful Halloween cookies decorated to look like mummies, offering a fun and delicious treat for all ages.
- Prep Time: 10 minutes
- Cook Time: 12 minutes
- Total Time: 22 minutes
- Yield: 24 cookies
- Category: Dessert
- Method: Baking
- Cuisine: American
- Diet: Vegetarian
Ingredients
- 1 cup chocolate fudge mix
- 1/2 cup butter, softened
- 1 cup powdered sugar
- 2 tablespoons milk
- 1 teaspoon vanilla extract
- Chocolate chips (for eyes)
- White decorative icing (for mummy wrapping)
Instructions
- Preheat your oven to 350°F (175°C).
- Prepare the chocolate fudge mix according to package instructions to create the cookie base.
- Roll the dough into 1-inch balls and place them on a lined baking sheet.
- Bake the cookies for 10-12 minutes until slightly firm.
- Cool the cookies on a wire rack completely.
- Make the frosting by mixing butter, powdered sugar, milk, and vanilla extract until smooth.
- Create mummy wraps using frosting on the top of each cookie.
- Add two chocolate chips on each cookie for the eyes.
- Serve and enjoy your Halloween Mummy Cookies!
Notes
Don’t overbake the cookies to ensure they stay soft. Practice piping the icing if you’re new to decorating.