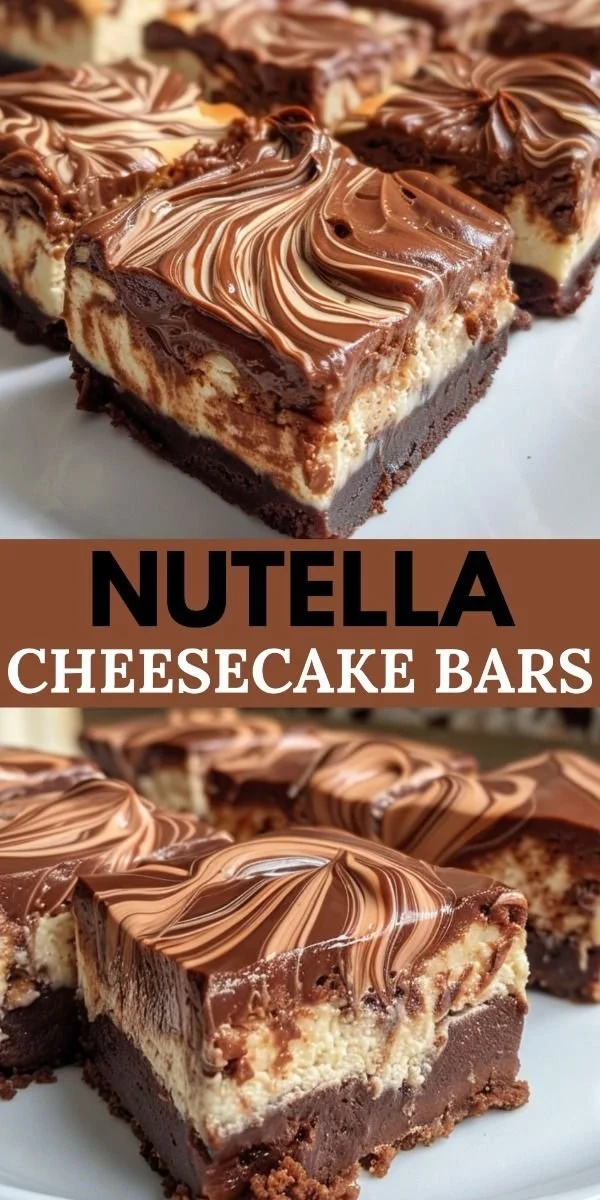
Nutella Cheesecake Bars are a deliciously indulgent dessert perfect for satisfying your sweet tooth. Combining the rich, creamy texture of cheesecake with the unique flavor of Nutella, these bars are simple to prepare and will surely impress your family and friends. With minimal ingredients and straightforward instructions, you’ll find this recipe is worth making again and again.
Why You’ll Love Nutella Cheesecake Bars
- Easy to Make: With just a few simple steps, even beginners can whip up a delicious batch.
- No-Bake Option: These bars can set in the fridge, making them perfect for warm weather or last-minute gatherings.
- Rich Flavor: The combination of Nutella and cream cheese creates a decadent treat that’s hard to resist.
- Perfect for Sharing: Cut into bars, these are ideal for potlucks and parties, allowing everyone to enjoy a slice.
- Versatile Dessert: Enjoy them chilled, at room temperature, or even slightly warmed – they’re great in any form.
Recipe Overview
- Prep Time: 15 minutes
- Cook Time: 30 minutes
- Total Time: 2 hours 45 minutes (includes chilling)
- Servings: 12 bars
- Difficulty Level: Easy
Ingredients You’ll Need for Nutella Cheesecake Bars
-
For the crust:
- 1 cup graham cracker crumbs
- 1/4 cup unsalted butter, melted
-
For the filling:
- 2 (8 oz) packages cream cheese, softened
- 1 cup powdered sugar
- 1 cup Nutella
- 2 eggs
- 1 tsp vanilla extract
- 1/4 cup heavy cream
The graham cracker crumbs form a buttery crust that complements the rich cheesecake filling. You can substitute the crust with digestive biscuits if desired. For a different flavor, consider adding crushed cookies or nuts to the crust.

How to Make Nutella Cheesecake Bars
-
Preheat the Oven: Preheat your oven to 350°F (175°C) and grease a 9×9 inch baking pan to ensure easy removal of the bars.
-
Prepare the Crust: In a mixing bowl, combine the graham cracker crumbs and melted butter until well blended. Press the mixture firmly into the bottom of the prepared baking pan to create a crust.
-
Mix the Filling: In another bowl, beat the softened cream cheese using an electric mixer until smooth and creamy. Gradually add in the powdered sugar, continuing to mix until fully combined.
-
Incorporate Nutella: Add the Nutella, eggs, and vanilla extract to the cream cheese mixture. Mix until everything is well combined and smooth.
-
Combine Layers: Pour the cream cheese mixture over the crust in the baking pan, spreading it evenly for even baking.
-
Bake: Bake for 25-30 minutes, or until the center is set but slightly jiggles when shaken lightly.
-
Cool Down: Let the bars cool completely at room temperature, then refrigerate for at least 2 hours before cutting into squares.
-
Serve: Enjoy your Nutella Cheesecake Bars chilled for the best texture!
Tips for Success
- Room Temperature Ingredients: Make sure the cream cheese is softened to room temperature for easier blending and a smoother filling.
- Check for Doneness: Avoid overbaking; the center should remain slightly wobbly as it will firm up while cooling in the fridge.
- Smooth Slices: For clean cuts, use a knife dipped in hot water, then wipe it clean after each slice.
- Let Them Chill: Allow enough time for the bars to chill properly, as this enhances the flavors and texture.
Easy Variations
- Nut-Free Option: Use a creamy chocolate spread instead of Nutella for a nut-free version.
- Add Some Flavor: Incorporate a few tablespoons of espresso for a coffee-flavored variant.
- Fruit Toppings: Serve the bars with fresh berries or a fruit sauce for a refreshing twist.
- Chocolate Swirls: Melt some chocolate and drizzle it over the top before chilling for a decorative touch.
What to Serve with Nutella Cheesecake Bars
- Coffee: The rich flavors pair perfectly with a cup of coffee, balancing the sweetness.
- Ice Cream: Serve alongside vanilla or hazelnut ice cream for a delightful contrast in temperature and texture.
- Fresh Fruit: Strawberries or raspberries add a bright, tangy flavor that cuts through the cheesecake richness.
- Whipped Cream: A dollop of whipped cream on top enhances the texture and creates a lovely presentation.
Storage and Reheating
- Refrigerator Storage: Store leftover bars in an airtight container in the fridge for up to five days.
- Freezer Storage: Wrap the bars tightly and freeze for up to three months. Thaw overnight in the refrigerator before serving.
- Reheating: For a warm treat, microwave for a few seconds until just softened, but avoid overheating to maintain texture.
Common Mistakes to Avoid
- Not Softening Cream Cheese: Failing to soften the cream cheese will result in a lumpy filling.
- Overmixing: Mixing the eggs too aggressively can introduce air, causing cracks during baking.
- Ignoring Chill Time: Skipping the refrigeration step makes the bars difficult to cut and serve.
Nutella Cheesecake Bars: Background & Cultural Inspiration
Nutella Cheesecake Bars combine two beloved dishes: cheesecake and Nutella. Cheesecake has roots in Ancient Greece, while Nutella originated in Italy in the 1960s. The blend of these two treats reflects a fusion of cultures and showcases how classic desserts can evolve. These bars are not just a dessert but a celebration of flavors, cherished in many households, and a testament to the joy of simple yet luxurious indulgence.
Frequently Asked Questions
Can I use low-fat cream cheese?
Yes, you can use low-fat cream cheese for a lighter version, but it may affect the texture slightly.
How long do these bars last in the fridge?
Nutella Cheesecake Bars can last up to five days in an airtight container in the refrigerator.
Can I make these bars ahead of time?
Absolutely! You can prepare them a day or two in advance. Just make sure to keep them stored properly in the fridge.
What can I substitute for Nutella?
You can substitute Nutella with any other chocolate-hazelnut spread or a homemade chocolate ganache for a different flavor.
What should I do if the bars crack on top?
Cracking can occur if the mixture is overmixed or if it cooks too long; aiming for a slight jiggle in the center will help prevent this.
Final Thoughts
Nutella Cheesecake Bars are the perfect treat for any occasion, whether it’s a family gathering or a quiet evening at home. Their creamy texture and rich flavor make them irresistible. Don’t hesitate to give this easy recipe a try; you’ll be rewarded with a delightful dessert that everyone will love!
PrintNutella Cheesecake Bars
Deliciously indulgent Nutella Cheesecake Bars combining creamy cheesecake with rich Nutella, perfect for any occasion.
- Prep Time: 15
- Cook Time: 30
- Total Time: 165
- Yield: 12 bars
- Category: Dessert
- Method: Baking
- Cuisine: American
- Diet: Vegetarian
Ingredients
- 1 cup graham cracker crumbs
- 1/4 cup unsalted butter, melted
- 2 (8 oz) packages cream cheese, softened
- 1 cup powdered sugar
- 1 cup Nutella
- 2 eggs
- 1 tsp vanilla extract
- 1/4 cup heavy cream
Instructions
- Preheat your oven to 350°F (175°C) and grease a 9×9 inch baking pan.
- Combine the graham cracker crumbs and melted butter in a mixing bowl.
- Press the mixture into the bottom of the prepared baking pan to create a crust.
- Beat the softened cream cheese in another bowl until smooth and creamy.
- Add the powdered sugar gradually, mixing until fully combined.
- Incorporate Nutella, eggs, and vanilla extract to the cream cheese mixture until smooth.
- Pour the mixture over the crust, spreading it evenly.
- Bake for 25-30 minutes, until the center is set but jiggles slightly.
- Cool completely at room temperature, then refrigerate for at least 2 hours before cutting.
- Enjoy your Nutella Cheesecake Bars chilled for the best texture!
Notes
Ensure cream cheese is at room temperature for smoother filling. Use a hot knife for clean cutting.